Master Touch Typing: Your Guide to Faster Typing Speed & High WPM Test Results
Frustrated with slow typing? Many of us are, constantly glancing at the keyboard and feeling productivity slip. Learning touch typing is a simple yet powerful skill that can change that. This guide will show you how to type efficiently and confidently, whether for school, work, or fun. Ready to type smarter? Let's start by testing your current typing speed to see where you're at.
The Foundations: Proper Posture & Finger Placement
Before you dive into the drills, setting yourself up for success is crucial. Proper posture and accurate finger placement keyboard are the bedrock of efficient touch typing. Neglecting these basics can lead to discomfort, fatigue, and ultimately, hinder your progress. Think of it as preparing your workstation for a marathon, not just a quick sprint.
Setting Up Your Typing Station: Ergonomics for Comfort & Speed
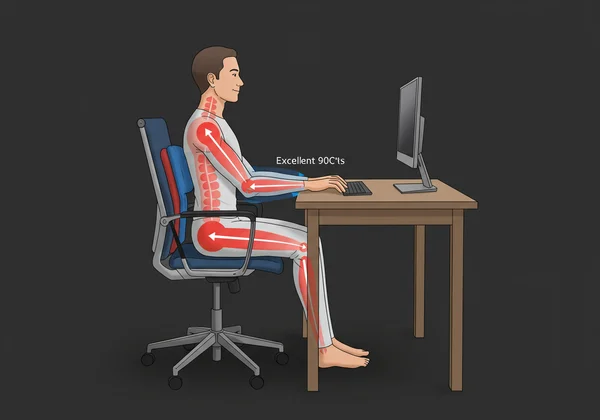
Ergonomics plays a pivotal role in preventing strain and ensuring sustained typing. Start by ensuring your chair provides good lumbar support, allowing you to sit upright with your feet flat on the floor. Your elbows should be bent at a 90-degree angle, with your forearms parallel to the floor. The keyboard should be positioned directly in front of you, centered with your body. Adjust your monitor so the top of the screen is at eye level, about an arm's length away, to avoid neck strain. A slight tilt in your keyboard can also enhance comfort. Proper setup ensures your body is relaxed, allowing your fingers to move freely and reduce the risk of injuries like carpal tunnel syndrome, making your practice sessions more effective.
Understanding the Home Row: Your Typing Anchor
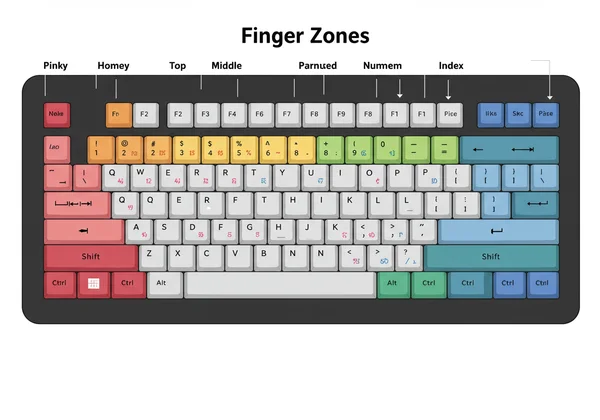
The home row is the central starting point for all your fingers in touch typing. For most QWERTY keyboards, these are the 'ASDF' for your left hand and 'JKL;' for your right hand. You'll notice small raised bumps on the 'F' and 'J' keys. These are tactile indicators that allow you to locate the home row without looking down. Your index fingers should rest on these bumps, with the remaining fingers naturally falling into place on the adjacent keys. Your thumbs rest lightly on the spacebar. Mastering the home row is fundamental because all finger movements start and end from this position, creating a reliable anchor point for muscle memory development.

Your First Drills: Mastering Each Keyboard Row
With your posture set and fingers positioned on the home row, it's time to begin your beginner typing lessons. The key here is patience and precision over speed. Focus on striking the correct keys with the correct fingers, always returning to the home row after each keystroke. This systematic approach builds the foundational muscle memory required for fluid touch typing.
Fingers on the Home Keys: ASDF JKL; Practice
Start by practicing individual key strokes on the home row itself.
- Left Hand: Your pinky for 'A', ring finger for 'S', middle finger for 'D', and index finger for 'F'.
- Right Hand: Your index finger for 'J', middle finger for 'K', ring finger for 'L', and pinky for ';'. Practice typing sequences like "asdf jkl; asdf jkl;" repeatedly. Then try combinations of these keys: "add fall ask sad lass", ensuring your fingers return to their home row position after each key press. Focus on light, consistent presses. This fundamental exercise solidifies your finger placement and sets the rhythm.
Expanding Your Reach: Practicing the Top Row (QWERTY)
Once the home row feels natural, extend your reach to the QWERTY top row. Each finger is responsible for reaching up to its assigned key on the top row and then returning swiftly to the home row. For example:
- Left index finger reaches for 'R' and 'T'.
- Left middle finger reaches for 'E'.
- Left ring finger reaches for 'W'.
- Left pinky reaches for 'Q'.
- Right index finger reaches for 'U' and 'Y'.
- Right middle finger reaches for 'I'.
- Right ring finger reaches for 'O'.
- Right pinky reaches for 'P'. Practice phrases and words that primarily use these two rows, such as "type write quiet our pool", always emphasizing the return to the home row.
Covering the Bottom Row & Numbers: Full Keyboard Command
Finally, integrate the bottom row and the number row into your practice. The principle remains the same: extend to the key, press, and return to the home row.
-
Bottom Row: Fingers reach down (e.g., left pinky for 'Z', right index for 'N', 'M').
-
Number Row: Fingers reach up from their home row positions (e.g., left index for '4' and '5', right index for '6' and '7'). For symbols (like Shift, Ctrl, Alt, Enter), use your pinkies or thumbs, depending on the key and your comfort. Practice sentences that include characters from all three main rows and numbers to achieve full keyboard command. Remember, consistency builds muscle memory, which is key to typing without looking.
Beyond the Basics: Building Speed & Accuracy with Practice
Learning touch typing is a marathon, not a sprint. While the initial focus is on correct finger movements, the ultimate goal is to learn typing fast and accurately. This next phase focuses on refining your skills and pushing your limits responsibly.
Why Accuracy Trumps Speed (Especially for Beginners)
This is a critical point: accuracy is more important than raw speed, especially when you're just starting. Every error you make requires a correction (backspace), which not only adds keystrokes but also breaks your rhythm and concentration. A slow, accurate typist is often more efficient than a fast, inaccurate one. Focusing on accuracy builds clean muscle memory. Once your fingers reliably hit the correct keys without thinking, speed will naturally follow. Prioritize precision in every drill.
Recommended Daily Drills & Consistent Practice Habits
Consistency is the undisputed champion of skill development. Aim for short, focused daily drills rather than long, infrequent sessions. Even 15-20 minutes of dedicated practice each day can yield remarkable results.
- Start with basic word lists: Focus on common words and letter combinations.
- Progress to sentences and paragraphs: This helps build rhythm and context awareness.
- Vary your practice material: Don't stick to the same text every time. Use diverse content to challenge your finger movements.
- Avoid looking at the keyboard: This is paramount. If you find yourself peeking, slow down until you no longer need to.
- Breaks are important: If you feel fatigued or frustrated, take a short break. Maintaining consistent practice habits is key to long-term success.
How WPM Tests Accelerate Your Learning Journey
As you progress, you'll need a way to measure your improvement and identify areas for refinement. This is where WPM tests become invaluable tools. A typing speed test provides real-time feedback on your words per minute (WPM) and, crucially, your accuracy percentage.
A free WPM test platform offers a free WPM test that helps accelerate your learning journey in several ways:
-
Real-time Feedback: See your speed and errors instantly, allowing you to self-correct during practice.
-
Measurable Progress: Track your WPM and accuracy over time. Watching your scores improve is incredibly motivating and helps confirm that your practice is paying off. You can discover your typing results right away.
-
Customizable Practice: Our platform allows you to adjust test durations and even use custom text. This is fantastic for practicing specific vocabulary (e.g., for coding, medical terms) or challenging yourself with texts you enjoy. You can easily start your typing test with custom settings.
-
Multi-language Support: If you type in multiple languages, this versatile tool supports a wide array of languages, making it a versatile tool for diverse typing needs.

Using a wpm test online regularly helps you turn abstract practice into concrete progress. It provides a benchmark and highlights areas where you need more attention, transforming your practice from guesswork to a data-driven approach. Ready to see your improvement? Practice your skills and measure them today!
Your Journey to Typing Mastery: Consistent Practice Pays Off
As you progress on your touch typing journey, remember that consistent practice is your most powerful tool. Embrace the small steps forward, celebrate your growing fluency, and utilize our WPM test tool to monitor your progress and keep you motivated. This isn't just about speed; it's about gaining digital confidence and efficiency. So, what are you waiting for? Test your WPM today and take that next step towards fluent, effortless typing!
FAQ Section: Frequently Asked Questions About Learning Touch Typing
How to improve typing speed effectively?
To improve typing speed effectively, focus on touch typing techniques: maintain proper posture, learn finger placement keyboard on the home row, and use all ten fingers. Practice regularly with diverse texts, prioritize accuracy over speed initially, and use a reliable typing speed test tool to get real-time feedback and track your progress. Consistency and mindful practice are key.
What is a good WPM score for a beginner?
For a complete beginner, any WPM score above 10-20 WPM is a good start, especially if you're focusing on accuracy. As you practice consistently using touch typing methods, aim to gradually increase your speed while maintaining high accuracy. Many users can reach 30-40 WPM with regular practice within a few weeks. The key is consistent, disciplined practice.
How can I test my typing speed and accuracy for free?
You can easily test your typing speed and accuracy for free by visiting an online platform like this one. Simply go to WPMTest.cc, choose your preferred test duration (e.g., 1 minute, 3 minutes), and start typing the provided text. The platform will instantly calculate your Words Per Minute (WPM), Characters Per Minute (CPM), and accuracy percentage, providing immediate results without any registration.